Record and Export Vertical Videos in Screen Studio: A Complete Guide for TikTok & Instagram Reels (2026)
Vertical video now accounts for 95% of all mobile video consumption. If you create screen recordings for TikTok or Instagram Reels, Screen Studio makes it easy to record, reframe to 9:16, add auto-zoom, generate AI captions, and export — all without juggling multiple apps.
In This Guide — 7 Sections
- Why Vertical Video Matters for Screen Recordings
- What Makes Screen Studio Ideal for Vertical Recording
- How to Set Up a Vertical 9:16 Recording
- Adding Zoom Effects for Engaging Vertical Content
- Customising Background and Cursor Settings
- Best Export Settings for TikTok & Instagram Reels
- Optimising Vertical Videos for Maximum Engagement
In 2026, 82% of all internet traffic is video, with short-form vertical content driving the majority of social engagement. TikTok posts alone generate an average engagement rate of 5.3%, outperforming every other major platform. If you create tutorials, product demos, or app walkthroughs, you need vertical screen recordings that look polished and professional.
Screen Studio, a macOS screen recording app built for content creators, removes all the friction. You record your screen once, reframe to 9:16 inside the editor, apply auto-zoom, add AI captions, and export as MP4 — all in a single workflow, no additional tools required.
📱 1. Why Vertical Video Matters for Screen Recordings
Mobile users now watch 95% of their video content vertically. Platforms built their entire algorithms around this behaviour — TikTok, Instagram Reels, and YouTube Shorts all prioritise 9:16 content in their recommendation systems.
5.3% avg engagement rate. 15–60 sec sweet spot. Captions drive 80% more watch time on mute.
35% more engagement than standard posts. 15–30 sec max for best retention and reach.
Over 70 billion daily views. Shares the same horizontal library — one video, two audiences.
Creators who publish 1080×1920 content saw a 51% increase in uploads year-over-year. Sticking to full-HD vertical resolution ensures your content looks sharp on every device — from the smallest smartphone to a tablet.
For app developers, SaaS marketers, course creators, and indie hackers showing off their product, vertical screen recordings are no longer optional — they are the expected format for reaching a mobile-first audience.
🎬 2. What Makes Screen Studio Ideal for Vertical Recording
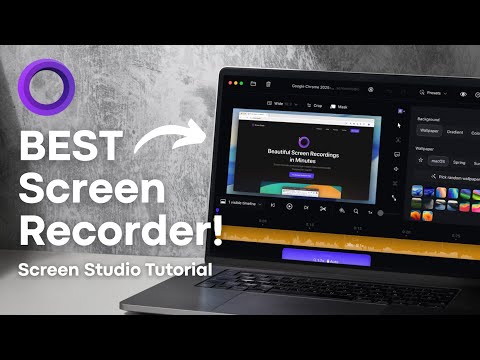
Most screen recorders were built for landscape output. Exporting vertical video typically means recording at a custom resolution, cropping in a separate editor, and manually adjusting zoom areas. Screen Studio eliminates all of that.
Unlike OBS or QuickTime, Screen Studio lets you change the video aspect ratio after recording, directly inside its editor. Record your screen normally, then switch to vertical with one click. No re-recording, no cropping workflow, no third-party editor needed.
Key capabilities that make Screen Studio the right tool for vertical social content:
▶ Watch: Screen Studio aspect ratio switching and vertical export in action
| Feature | Screen Studio | OBS Studio | QuickTime | Loom |
|---|---|---|---|---|
| 9:16 Export | ✅ In-editor | ⚠️ Manual setup | ❌ No | ❌ No |
| Post-Record Reframe | ✅ Yes | ❌ Pre-record only | ❌ No | ❌ No |
| Auto-Zoom | ✅ Automatic | ❌ None | ❌ None | ⚠️ Basic |
| AI Captions | ✅ On-device | ❌ None | ❌ None | ⚠️ Cloud only |
| Branded Background | ✅ Fully custom | ⚠️ Overlays | ❌ None | ❌ None |
| Cursor Smoothing | ✅ Yes | ❌ None | ❌ None | ❌ None |
| Mac Native App | ✅ Yes | ✅ Yes | ✅ Yes | ⚠️ Browser |
⚙️ 3. How to Set Up a Vertical 9:16 Recording
Getting started with vertical video in Screen Studio does not require any special recording setup. You record your screen normally and convert to 9:16 in the editor afterward.
-
1Open Screen Studio and Begin a New Recording
Launch Screen Studio and start recording your screen as normal. Select your desired capture area — full screen, a window, or a custom region. You do not need to configure vertical resolution before recording.
-
2Record Your Content in Landscape Mode
Record your tutorial, app walkthrough, or product demo at your screen's native resolution. Keep your key content — the cursor, important UI elements — centred or in the middle third of the screen for best vertical framing results.
-
3Open the Editor and Locate the Aspect Ratio Selector
Once recording is finished, the Screen Studio editor opens automatically. Look for the aspect ratio option just above the video preview area. Screen Studio shows several preset options.
-
4Select Vertical (9:16) from the Aspect Ratio Menu
Click the 9:16 Vertical option. Your recording instantly reframes to vertical orientation. Screen Studio fills the remaining space with your chosen background, giving it that polished, branded look.
-
5Enable "Always Keep Zoomed In" for a Focused Frame
After switching to 9:16, you will see an option labelled "Always keep zoomed in". Turn this on. Your visible area crops to the 9:16 window and follows your cursor as it moves — giving a dynamic, focused result that works brilliantly on small screens.
-
6Preview and Trim Your Clip
Use the timeline to trim your clip to 30–60 seconds for maximum platform engagement. Preview the vertical output to check cursor framing and zoom transitions before exporting.
Available Aspect Ratio Presets in Screen Studio
| Aspect Ratio | Format | Resolution | Best Use |
|---|---|---|---|
| 16:9 | Wide (Landscape) | 1920×1080 / 3840×2160 | YouTube, Presentations, LMS |
| 9:16 ⭐ | Vertical | 1080×1920 | TikTok · Instagram Reels · YouTube Shorts |
| 1:1 | Square | 1080×1080 | Instagram Feed, Facebook |
| 4:3 | Classic | 1440×1080 | Older displays, Zoom calls |
| 3:4 | Tall Portrait | 810×1080 | Pinterest, Portrait content |
When ON: the visible area crops to 9:16 and follows your cursor dynamically — best for tutorials and demos. When OFF: Screen Studio shows a letterboxed version of your full screen inside the vertical frame — useful only if you need to show the complete desktop layout. For most TikTok and Reels content, leave it ON.
📱 Create Vertical Screen Recordings in One Click
Screen Studio's 9:16 reframing, auto-zoom, and AI captions make social-ready vertical videos faster than any other workflow. Annual plan at 70% OFF.
Free plan available · Annual plan $9/month · 30-day money-back guarantee
🔍 4. Adding Zoom Effects for Engaging Vertical Content
Zoom effects transform ordinary screen recordings into compelling short-form content. On a 9:16 vertical frame viewed on a phone, subtle zoom transitions guide attention exactly where you want it — making your demos far easier to follow on small screens.
Two Zoom Modes
Screen Studio automatically zooms to your cursor clicks. Every click triggers a smooth zoom-in, then zooms back out naturally. Zero manual work — ideal for fast-paced app demos and product walkthroughs where every action needs emphasis.
Click on the zoom timeline at any point in your recording to add a custom zoom. Drag the zoom edges to adjust duration. Use the zoom level slider to set exactly how far in to zoom. Perfect for highlighting specific UI sections or data points.
To add a manual zoom, click on the zoom timeline at the desired point in your recording, drag the zoom edges to set the duration, and use the zoom level slider to control intensity. Auto zoom works brilliantly for app demo videos where you want viewers to follow each action closely — especially important on small mobile screens where UI elements can be hard to see.
For 9:16 vertical recordings, use auto zoom on by default, then add 1–2 manual zooms to highlight the single most important feature or action. Over-zooming fragments the flow — aim for a smooth, guided experience that feels intentional rather than jumpy.
🎨 5. Customising Background and Cursor Settings
Screen Studio renders your recording onto a customisable background. In vertical format, this background fills the area above and below your screen content, giving your vertical videos a professional, branded appearance instead of raw black bars.
Background Options
- Solid colours — match your brand identity for consistent visual recognition across posts
- Gradients — create visual depth without requiring design skills; dark gradients work particularly well for dark-UI apps
- Custom background images — use a branded wallpaper, a blurred screenshot of your app, or any image you supply
- Blur effects — a blurred version of your recording as the background gives a clean, app-store-preview aesthetic
Cursor Settings for Mobile Viewers 🖱️
Mobile viewers on small screens need larger, more visible cursor indicators. Screen Studio gives you full control:
- ✅ Increase cursor size — larger cursors are essential on vertical mobile content; default size is often too small
- ✅ Enable click effects — visible ripple or spotlight on clicks helps viewers track your actions on a crowded UI
- ✅ Enable click sounds — subtle audio cues help viewers on mute still follow the flow of your demo
- ✅ Enable "Hide cursor when not moving" — reduces clutter between actions; cursor disappears when idle and reappears on movement
- ✅ Cursor rotation & loop position — useful for loopable content where you want the cursor to return to start seamlessly
- ❌ Don't use default (tiny) cursor size on vertical content — mobile viewers genuinely cannot track it
🎨 Brand Every Frame of Your Vertical Content
Custom backgrounds, cursor animations, zoom effects — Screen Studio makes your vertical screen recordings look like they came from a design studio. 70% OFF Annual plan.
🛡️ 30-day money-back · Annual plan · Use on 3 Macs
📦 6. Best Export Settings for TikTok & Instagram Reels
Once editing is complete, click the Export button in the top-right corner of Screen Studio. An export settings window opens where you configure format, resolution, frame rate, and compression quality.
▶ Watch: Screen Studio export settings — choosing MP4, resolution, and frame rate for vertical social content
Recommended Export Settings
| Setting | Recommended Value | Notes |
|---|---|---|
| Format | MP4 | Always MP4 for social uploads — GIF only for very short clips embedded on websites |
| Resolution | 1080 × 1920 (Full HD Vertical) | Required by TikTok, Reels, and Shorts for maximum quality. 4K vertical (2160×3840) available for future-proofing |
| Frame Rate | 30 FPS (standard) / 60 FPS (smooth) | 30 FPS for most tutorials; 60 FPS if recording fast animations or game UI |
| Quality / Compression | High quality | Compression level does not significantly affect export time in Screen Studio |
| Audio | Include audio (or mute if voiceover not needed) | 63% of branded mobile content is optimised for silent viewing — add AI captions if muting |
Always use MP4 for TikTok, Instagram Reels, and YouTube Shorts. GIF files lack audio support, cannot be directly uploaded to these platforms, and a 30-second 1080p GIF can exceed 50 MB — too large for social platforms. GIF is only suitable for short embedded demos on websites (under 15 seconds).
Vertical HD (1080×1920) saw 51% more uploads compared to last year as creators standardise on full-HD vertical output. Sticking to this resolution ensures your content looks sharp on both TikTok and Instagram Reels across all device types.
Add AI Captions Before Exporting
Before exporting, enable Screen Studio's on-device Whisper AI captions. Over 63% of branded mobile content is optimised for silent viewing — captions ensure your demo is fully accessible to viewers watching without audio on public transport, in offices, or in any sound-sensitive environment.
For vertical social content, ensure captions are positioned in the lower third of the 9:16 frame — not over critical UI elements. Check caption positioning after switching aspect ratios; what works at 16:9 may need adjustment at 9:16.
📈 7. Optimising Vertical Videos for Maximum Engagement
Getting the format right is only half the job. Optimising your content for platform algorithms and viewer behaviour drives the real results. Here is what the data tells us for short-form vertical screen recordings:
"Videos under one minute average a 50% engagement rate — outperforming every other content type. Instagram Reels deliver 35% more engagement than standard video posts."
— Social Media Benchmark Report, 2026Engagement Best Practices
- ✅ Hook in the first 2–3 seconds — show an instant action or on-screen result; do not start with an intro screen
- ✅ Keep recordings between 30–60 seconds — under-60-second videos average 50% engagement rate across platforms
- ✅ Add AI captions — 63% of branded mobile content is optimised for silent viewing; captions are not optional
- ✅ Use auto-zoom on every key action — mobile viewers cannot see small UI details without zoom guidance
- ✅ Export at 30 FPS minimum — platforms penalise sub-30 FPS uploads in quality and reach metrics
- ✅ Show one feature per clip — single-focus demos perform better than multi-step walkthroughs in short-form format
- ✅ Use a branded background — custom background at 9:16 fills dead space and builds visual consistency
- ❌ Don't start with a silent, static screen — you lose 60% of viewers in the first 3 seconds
- ❌ Don't export at 720p or lower — platforms down-rank low-resolution vertical content in recommendations
- ❌ Don't use default small cursor size on vertical content — mobile viewers can't track it
🚀 Complete 8-Step Vertical Video Workflow
Here is the full streamlined workflow for producing vertical screen recordings with Screen Studio:
-
1Record your screen in landscape mode as normal
Keep key content centred or in the middle third of the screen for clean vertical cropping.
-
2Open the editor and switch aspect ratio to 9:16 Vertical
One click in the aspect ratio selector above the preview. Your recording reframes instantly.
-
3Enable "Always keep zoomed in" for a focused frame
The visible area follows your cursor, giving the dynamic, mobile-native feel TikTok viewers expect.
-
4Add zoom effects on key actions and clicks
Use auto zoom as your base; add 1–2 manual zooms to emphasise the most important UI moments.
-
5Customise background colour and increase cursor size
Set a branded background for visual consistency. Enable click effects for better action visibility on small screens.
-
6Add AI captions using on-device Whisper transcription
Enable captions in the right panel, choose your model, click Generate. Check positioning in the lower third of the vertical frame.
-
7Trim to 30–60 seconds and preview
Check the full vertical preview. Confirm zoom transitions, caption position, and overall pacing before export.
-
8Export as MP4 at 1080×1920, 30 FPS, high quality — then upload
Directly upload to TikTok, Instagram Reels, or YouTube Shorts. One recording, three platforms.
🎬 Start Creating Vertical Content With Screen Studio
Screen Studio simplifies what used to require multiple tools and manual resolution tweaks. With a single recording and a few clicks in the editor, you can produce professional vertical videos for social media that match platform standards and grab viewer attention from the first frame.
Record once in landscape. Reframe to 9:16. Enable always-keep-zoomed-in. Add auto-zoom, AI captions, and a branded background. Export as MP4 at 1080×1920. Upload to TikTok, Reels, and Shorts. Done — in under 15 minutes from recording to publish.
📱 Record Vertical Videos for TikTok & Reels Today
Screen Studio's 9:16 vertical export, auto-zoom, AI captions, and branded backgrounds are all included on every paid plan. Annual plan 70% OFF at just $9/month.
Annual plan · $9/month · Billed $108/year · Save $240 · 30-day money-back guarantee
Affiliate Disclosure: This guide contains affiliate links to Screen Studio. We earn a commission if you purchase through our links at no extra cost to you. All recommendations are based on hands-on testing and independent research.