How to Use Screen Studio for Online Courses: A Step-by-Step Recording & Publishing Guide (2026)
If you create online courses on a Mac, Screen Studio might be the only screen recording software for course creators you'll ever need. It handles recording, editing, and exporting in one app — so you spend less time on tech and more time teaching.
In This Guide — 7 Sections
- Setting Up Screen Studio for Course Recording
- Recording Your Course Lessons Like a Pro
- Editing Course Videos Without Leaving the App
- Exporting for Multiple Platforms from One Recording
- Publishing Your Course on an LMS or Video Host
- Screen Studio vs Camtasia vs OBS vs Loom
- Sample Course Workflow & Who Should Use It
Most course creators juggle three or four tools just to get a polished lesson out. One app records the screen. Another handles the webcam. A third fixes audio. And then you still need a video editor. Screen Studio wraps all of that into a single workflow built for macOS.
It auto-zooms on clicks, smooths cursor movement, removes background noise, and even generates subtitles on-device. No cloud uploads. No privacy worries. And unlike Camtasia or OBS, there is almost no learning curve — most course creators produce their first polished lesson within an hour of installing it.
Below is a full walkthrough from setting up your first recording to hitting publish.
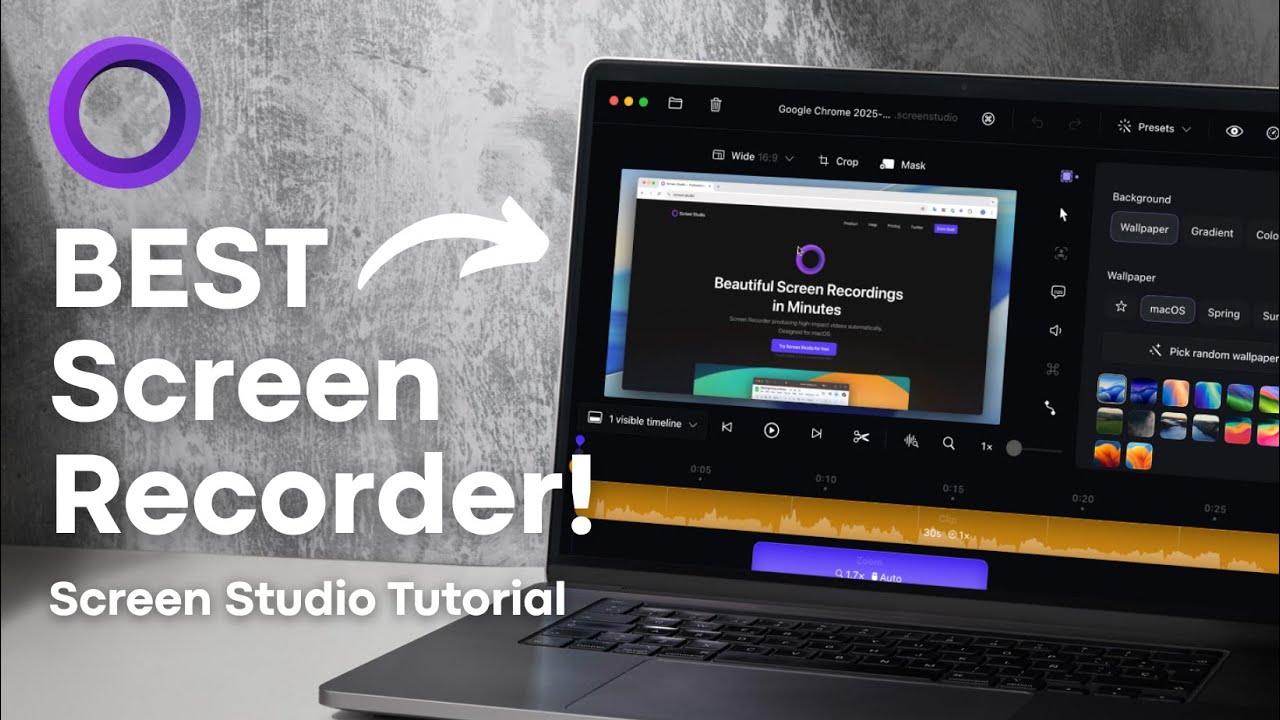
Screen Studio is macOS-native, meaning it integrates directly with your display, webcam, and microphone at the system level. No plugins. No browser extensions. Just open, configure, and record.
🖥️ 1. Setting Up Screen Studio for Course Recording
Before you press record, a little setup goes a long way. Getting your configuration right once means you can start any future lesson in under 60 seconds.
-
1Select Your Recording Area
Open Screen Studio and choose your input source — a specific display, a single app window, or a custom partial screen area. For software tutorials, selecting just the relevant app window keeps the frame tight and your students focused on exactly what matters.
-
2Enable Webcam Overlay
Toggle on your webcam to add a picture-in-picture face feed. Screen Studio automatically positions the selfie window so it never obstructs your cursor or any important UI element. You can adjust size and corner position without leaving the setup screen.
-
3Set Microphone and System Audio
Select your microphone from the input dropdown and toggle system audio capture separately. You get individual level controls for each, so checking your audio balance takes seconds. Screen Studio shows a live input meter so you can confirm your mic is picking up correctly before recording.
-
4Enable Background Noise Removal
Toggle on built-in noise removal before recording. It runs locally on your Mac and strips out fans, keyboard clicks, ambient room sound, and HVAC hum automatically — no plugins, no cloud processing. Your voiceover will sound clean even in a home office environment.
-
5Set Resolution and Save a Template
Choose your resolution — Screen Studio supports 4K recording for tutorials, which keeps text, code blocks, and UI elements razor-sharp on any display size or after platform compression. Once configured, save as a template so every future lesson starts with your exact settings pre-loaded.
After completing your first full setup, save it as a named template in Screen Studio. For subsequent lessons, open the template and you're recording-ready in under 30 seconds — no re-configuring input sources, resolution, or noise removal.
🎙️ 2. Recording Your Course Lessons Like a Pro
Hit Record. Screen Studio captures everything in real time with minimal CPU load, so your Mac stays fully responsive — you can keep your slides, browser, and IDE open without performance drops.
▶ Watch: Screen Studio in action — how auto-zoom and cursor smoothing work during a live recording
Here is what happens behind the scenes while you teach — you don't need to think about any of these during recording:
- Auto-zoom follows your cursor — detects every click, menu open, and form interaction; zooms into the exact area smoothly. Your students always see what matters, even on large 4K exports.
- Smooth cursor animation — replaces jerky mouse movement with a clean, steady glide. Your demos look deliberate, not rushed.
- Webcam background removal — isolates your face and hides a messy desk, home office, or distracting background. No green screen needed.
- Audio normalisation — balances your voice volume throughout the lesson, so quiet sections aren't inaudible and loud sections don't clip.
All of these features apply non-destructively during the editing and export stage. Your raw capture file stays untouched — you can always adjust or re-apply effects without re-recording.
For courses with multiple modules, record each lesson as its own file. This makes editing faster, keeps file sizes manageable, and allows you to re-record individual lessons without touching the rest of your course.
"I cut my post-production time by 75% after switching to Screen Studio. What used to take me over an hour per lesson now takes 20 minutes — and the videos look more professional."
— Sarah Johnson, online course creator with 15K+ enrolled students🎓 Try Screen Studio for Your Next Course Lesson
Start with the free plan, upgrade when you're ready. Annual plan at 70% OFF — just $9/month for the complete course creator toolkit on Mac.
Free plan available · Annual plan $9/month · 30-day money-back guarantee
✂️ 3. Editing Course Videos Without Leaving the App
Once you stop recording, Screen Studio opens its built-in editor automatically. There is no importing footage into a separate tool, no codec issues, and no waiting for render queues.
Timeline Editing
Screen Studio's visual timeline lets you drag zoom keyframes to adjust where and when the camera zooms in. Auto-zoom handles 95%+ of interactions, but you can also add manual zoom points on any moment it missed. Trimming mistakes is as simple as dragging the clip edge — no split-and-delete workflow.
AI Subtitle Generation
Click Generate Subtitles and Screen Studio's on-device AI transcribes your voiceover. The model runs locally — your audio never leaves your Mac. You can edit individual words, adjust timing, and style the subtitle appearance. Subtitles improve accessibility and engagement, especially for learners watching on mute or for whom English is a second language.
- Add branded backgrounds — pick solid colours, gradients, or image backgrounds that match your course brand
- Adjust outer spacing and corner radius — create the "floating screen" look popular in modern course content
- Tweak shadow depth and blur — adds depth and visual polish without any design skill
- Customise cursor size and click animations — make every interaction unmissable for learners on any device
AI transcription is accurate but not perfect, especially on technical terms, product names, and code syntax. Always do a quick review pass before exporting — it takes two minutes and makes a real difference to student comprehension.
📤 4. Exporting Course Videos for Multiple Platforms
Screen Studio supports multiple aspect ratios from a single recording. You do not need to re-record anything — Screen Studio recalculates all zoom animations and layouts automatically for each output format.
| Aspect Ratio | Best Platform | Primary Use Case |
|---|---|---|
| 16:9 | YouTube, LMS platforms, Vimeo | Full course lessons — primary format for every LMS |
| 9:16 | Instagram Reels, TikTok, YouTube Shorts | Short promotional clips — teasers, highlights, behind-the-scenes |
| 1:1 | LinkedIn, X (Twitter), Instagram Feed | Social media teaser clips, announcement posts |
| 4:3 | Legacy LMS platforms, Moodle, older web embeds | Compatibility mode for older platforms that don't support widescreen |
One recording session can produce a full YouTube lesson, a vertical promo reel, and a square social clip — without re-recording. Export as MP4 (H.264) for standard video hosting on all LMS platforms. Use GIF export for quick demo previews in email newsletters or course landing page demos.
Export your primary lesson in 1080p 16:9 MP4 (H.264) for maximum LMS compatibility. Export a second version in 9:16 for social media promotion. Both come from the same recording — no extra work required.
▶ Watch: Screen Studio multi-format export — 16:9 for LMS, 9:16 for social, all from one recording
📤 Export Once. Publish Everywhere.
Record your lesson once. Export for your LMS, YouTube, and Instagram from the same file. Screen Studio handles all re-zooming automatically.
🛡️ 30-day money-back · Annual plan · Use on 3 Macs
🚀 5. Publishing Your Course on an LMS or Video Host
After exporting, uploading to your course platform is straightforward. Screen Studio's output files are standard-format and accepted by every major platform without re-encoding.
LMS Platforms (Teachable, Thinkific, Kajabi)
Upload the 16:9 MP4 directly to your course module video section. Most LMS platforms accept standard H.264 MP4 files. Screen Studio's 4K output ensures text-heavy coding tutorials and UI walkthroughs stay sharp even after platform-side compression.
YouTube & Vimeo Hosting
Upload your exported MP4 and embed into your course site via the platform's iframe embed code. 4K resolution export ensures your text, code, and interface elements remain crisp at any playback resolution — including on 4K monitors and Retina displays.
Subtitles and Accessibility
Always export your subtitle file (.SRT) alongside the video and upload it to your platform. On YouTube, this improves SEO rankings for your tutorial content. On LMS platforms, it satisfies accessibility requirements and increases course completion rates for learners with hearing impairments.
- Teachable / Thinkific / Kajabi — upload MP4 and SRT separately in the lesson settings panel
- YouTube — upload SRT in the Subtitles tab under video details; it also feeds into auto-translate
- Udemy / Skillshare — both require SRT for accessibility compliance on new course uploads
- Self-hosted (WordPress + MemberPress) — use a video library like Bunny.net with SRT support for optimal streaming performance
Screen Studio includes built-in video link sharing. Before publishing to your LMS, share a preview link with a co-instructor, student beta tester, or editor. Get feedback without uploading to your platform — then publish the final version.
📊 6. Screen Studio vs Camtasia vs OBS vs Loom
Here is how Screen Studio stacks up against the most popular course recording tools on the features that matter most for tutorial and lesson content:
| Feature | Screen Studio ✨ | Camtasia | OBS Studio | Loom |
|---|---|---|---|---|
| Auto-Zoom on Clicks | ✅ Built-in | ❌ No | ❌ No | ❌ No |
| Background Noise Removal | ✅ Automatic | ⚠️ Manual plugin | ⚠️ Manual filter | ✅ Basic |
| AI Subtitle Generation | ✅ On-device | ⚠️ Paid add-on | ❌ No | ✅ Cloud-based |
| 4K Recording | ✅ Yes | ✅ Yes | ✅ Yes | ❌ No |
| Webcam BG Removal | ✅ Built-in | ❌ No | ❌ No | ✅ Yes |
| Multi-Format Export | ✅ Auto re-zoom | ⚠️ Manual | ⚠️ Manual | ❌ No |
| macOS Optimised | ✅ Native | ✅ Yes | ⚠️ Heavy on resources | ✅ Browser-based |
| Built-in Editor | ✅ Full timeline | ✅ Advanced NLE | ❌ No | ⚠️ Basic trim only |
| Local Processing | ✅ 100% local | ✅ Local | ✅ Local | ❌ Cloud only |
| Learning Curve | Very Low | High | Very High | Very Low |
| Pricing | $9/mo annual | $299.99/year | Free | Free / $12.50/mo |
| Best For | Tutorial courses & demos | Advanced editing | Live streaming | Quick async clips |
Screen Studio stands out for tutorial-style course content where auto-zoom and cursor effects make lessons dramatically easier to follow. OBS is free but demands hours of setup and has no editing tools. Camtasia is powerful but costs $299.99/year and has a steep learning curve. Loom works for quick clips but lacks the editing depth needed for professional course content.
"Screen Studio is the only screen recorder that makes my software tutorials look professionally produced — without any video editing experience on my part. The auto-zoom alone is worth the price."
— Jake Mitchell, online educator with 8,200+ students across Udemy and Skillshare🔄 7. Sample Course Workflow & Who Should Use Screen Studio
The Complete 6-Step Recording Workflow
Here is the practical step-by-step workflow you can follow for every lesson in your course:
Prepare everything you'll show on screen before recording. Minimise distractions — close irrelevant browser tabs, turn on Do Not Disturb, and use a clean desktop profile.
Load your preset template (mic, webcam, screen area, resolution, noise removal all pre-configured). If it's your first time, spend 5 minutes on initial setup and save as a template for all future lessons.
Small stumbles are easily trimmed in the editor. One continuous take is faster than trying to record a flawless run. Aim for natural pacing — Screen Studio's zoom and smoothing will clean up the recording automatically.
Trim dead time and mistakes. Review auto-zoom points and adjust any that missed. Click Generate Subtitles, do a quick accuracy review, and export your .SRT file. Apply your brand background and shadow settings.
Export in 1080p 16:9 MP4 for your LMS. Then switch aspect ratio and export a 9:16 vertical version for Instagram Reels, TikTok, or YouTube Shorts to promote the lesson. Screen Studio re-zooms automatically.
Upload the MP4 and SRT to your course platform. Publish the lesson. Optionally share the short-form vertical clip on social media to drive enrollment. A 15-minute lesson typically takes under 25 minutes from record to publish with this workflow.
A 15-minute lesson typically takes under 25 minutes from record to publish using this workflow — compared to over an hour with multi-tool setups. That's a massive time saving over the course of a full multi-module curriculum.
Who Should Use Screen Studio for Course Creation?
If you teach software, apps, or web tools, auto-zoom makes every click visible and comprehensible. Your recordings will look more professional than 90% of competing courses without extra editing.
4K recording keeps code readable on any screen. Auto-zoom on terminal commands, code selections, and IDE interactions keeps students focused on what matters — the code, not the cursor.
Record Notion workflows, spreadsheet walkthroughs, and dashboard tutorials with clean, auto-zoomed UI. Export branded videos that match your course aesthetic instantly.
Capture Figma, Sketch, Photoshop, or Canva sessions in 4K. The "floating screen" branding effect adds a cinematic quality that positions your course as premium content.
Screen Studio is macOS-only — Windows course creators cannot use it. And if your courses require advanced multi-camera editing, synchronised b-roll, or complex video effects, a dedicated NLE like Final Cut Pro is still necessary for that work.
🏆 The Bottom Line
For Mac-based course creators recording software walkthroughs, coding tutorials, or slide-based lessons, Screen Studio is the fastest path from recording idea to polished published video. It replaces your screen recorder, webcam tool, audio fixer, and video editor with a single app that handles everything automatically.
The auto-zoom screen recording feature alone makes your videos look more polished than 90% of competing courses on Udemy, Skillshare, or your own platform. Add AI subtitles, 4K output, and multi-format export — all from one take — and you have a professional course production workflow that doesn't require any video editing skill. 🏆
✅ Course Creator Quick Checklist
- ✅ Save a recording template with your full setup before your first lesson
- ✅ Record each module lesson as a separate file for easier editing
- ✅ Use 4K resolution for text-heavy code and UI tutorials
- ✅ Enable noise removal — even home offices have background noise
- ✅ Generate and review AI subtitles before every export
- ✅ Always upload an .SRT subtitle file alongside your video
- ✅ Export both 16:9 and 9:16 versions from every recording session
- ✅ Use the preview link share feature for pre-publish feedback
- ❌ Don't re-record to fix aspect ratio — use multi-format export instead
- ❌ Don't skip the subtitle edit pass on technical content
🎓 Start Creating Professional Course Videos Today
Annual plan at 70% OFF — $9/month for the complete course creator toolkit: 4K recording, auto-zoom, AI subtitles, webcam overlay, noise removal, and multi-format export. All in one Mac app.
Annual plan · $9/month · Billed $108/year · Save $240 · 30-day money-back guarantee
Affiliate Disclosure: This guide contains affiliate links to Screen Studio. We earn a commission if you purchase through our links at no extra cost to you. All recommendations are based on hands-on testing and independent research.